Showing posts with label family. Show all posts

Wednesday, December 30, 2015

Merry Christmas!

Merry Christmas one and all!


Thanks to Pam Kellogg and her request to participate in her 2016 Crazy Quilt calendar, I had a Christmas Card this year.

I looked at reviews of various card companies that would print out my own design.   I narrowed my search to TinyPrints, PaperCulture and Minted.

I chose Minted even though they were a tad more expensive because their Silver-Foil Merry Christmas design worked best with my embroidery.


When they arrived, I was extremely delighted with the quality of the card, envelope and packaging. I ordered the cards made from recycled paper.

The envelopes had a substantial feel and were perfect for stamping and embellishing...

I tucked in a little card that explained the embroidery...
It may seem old-fashioned...but I enjoy the process of making, addressing and sending Christmas cards.  

 The time it takes to address each one is time I take to reflect on the person to whom I'm sending the card...remembering our time together, sending gratitude for their friendship and lots of love and well wishes for the New Year.

And so from our house to yours...


Merry Christmas and Happy New Year!


P.S.  Pam Kellogg is having a contest for her calendar next year.  Anyone can enter and the theme is "My Secret Garden".  Entries are due by July 1, 2016 and you can read all the details on her post here.  Maybe I'll see you in next year's calendar!

P.P.S.  Take a moment to enjoy this video Christmas card I received from Hand & Lock...

P.P.P.S.  I had a three-year hiatus from sending Christmas cards 2012-2014 but here are my cards from other years past...

2011
2010
2009
2008
2007

Monday, August 17, 2015

Dip-Dye Fourth of July

Fourth of a July is a big holiday for our family as it's the one time a year that we are all on vacation at the same time. 

As the kids get older, their jobs and schedules are making this harder and harder to achieve and the time we're having all together is shrinking to a weekend or even just one day. 

Every year we choose some type of wearable art project to celebrate...

 
And this year we tried dip-dying.

I chose it because it was relatively simple and we all weren't going to be there until the actual day of Fourth of July.

The kids brought both denim and white items that they already owned or that they found at thrift stores.

The first step was bleaching out the denim...


This step took much longer than we expected so there was lots of hurry up and wait.  

I started with a three parts water to two parts bleach mix but that was taking a long time.  Lets just say that watching denim get bleached out is akin to watching paint dry...


That's when Jim suggested industrial strength bleach.  What?  There's different bleach strengths?  He ran to the hardware store and we mixed the stronger bleach;  two parts water and one part bleach.  

That sped things up a bit but it still took us a couple of hours to bleach out our items.


After bleaching, we had to wash and dry everything before dip dying.  In hindsight, we should have bleached days in advance to save time.  Experience is the greatest teacher.

When we finally got to the dip-dying...that went incredibly quickly and the results were immediate...


Bleach pens came in handy for fixing the stray drip...


Or for use as a design element...


Ideally, we should have let each color dry before dipping in the next but it was already becoming late afternoon...


So we rinsed out the dye while the items were still wet which affected the vibrancy...


But not the fun factor...


We also found that pre-worn and old denim bleached out the best.  Really dark, new denim never quite bleached out to white...more of a gray.

And the colors were more muted...which might be desirable for a more understated look...


Not all of us chose to dip-dye.  Ellie used her bleached denim shirt as a canvas for a painted design...
 

And we have a new furry family member, Moose, who was there to help tame the zoo...


Moose is calm in comparison.
By the time we were finished, there was very little time to wash/dry our items and get dressed for the night so we scattered without a group picture.


I remembered to snap one picture after dinner and before the fireworks...


I think we all agree that we'd like to re-try the dip dye activity...especially if we spread it out over a series of days, doing one dye step at a time and letting each step dry thoroughly in the sun before rinsing.

Time was our issue this year.  A harbinger of years to come, I think.

That means we'll have to come up with another way.

Maybe I'll have to mail pre-work or prep kits to everyone next year...hmmm....

~~~~~~~~~~~~~~~~~~~~~~~~~~~~~~~~~~~~~~~~~~~~~~~~~~

You can see our past patriotic projects here:

2010:  T-Shirts
2009:  T-Shorts
2008:  Baseball Hats

Friday, August 7, 2015

Ruby Rose

AWOL.  Absent without leave.

It's been two months since I've been here so I have a lot of catching up to do.  The good news is that my absence has been all for good reasons.  I've been busy engaging my life, loves, family and friends...and the chair in front of my computer has been so empty it had dust on it.

Jim, Jack and I traveled to Kyoto and Tokyo for ten days in July and I've been busy traveling, embroidering, exploring and enjoying life.  I'll do my best to get caught up on posts since there's a lot of experiences I'd love to share.

Rather than go chronologically, let's just join the movie already in progress.  This week, Jack was center stage as he had requested that I make him a very specific hat and sweatshirt.

I did what any sewing mother would do whose son hadn't asked her to make anything for him in over...umm, let's just say...five years or more.  I dropped everything in order to meet his request.

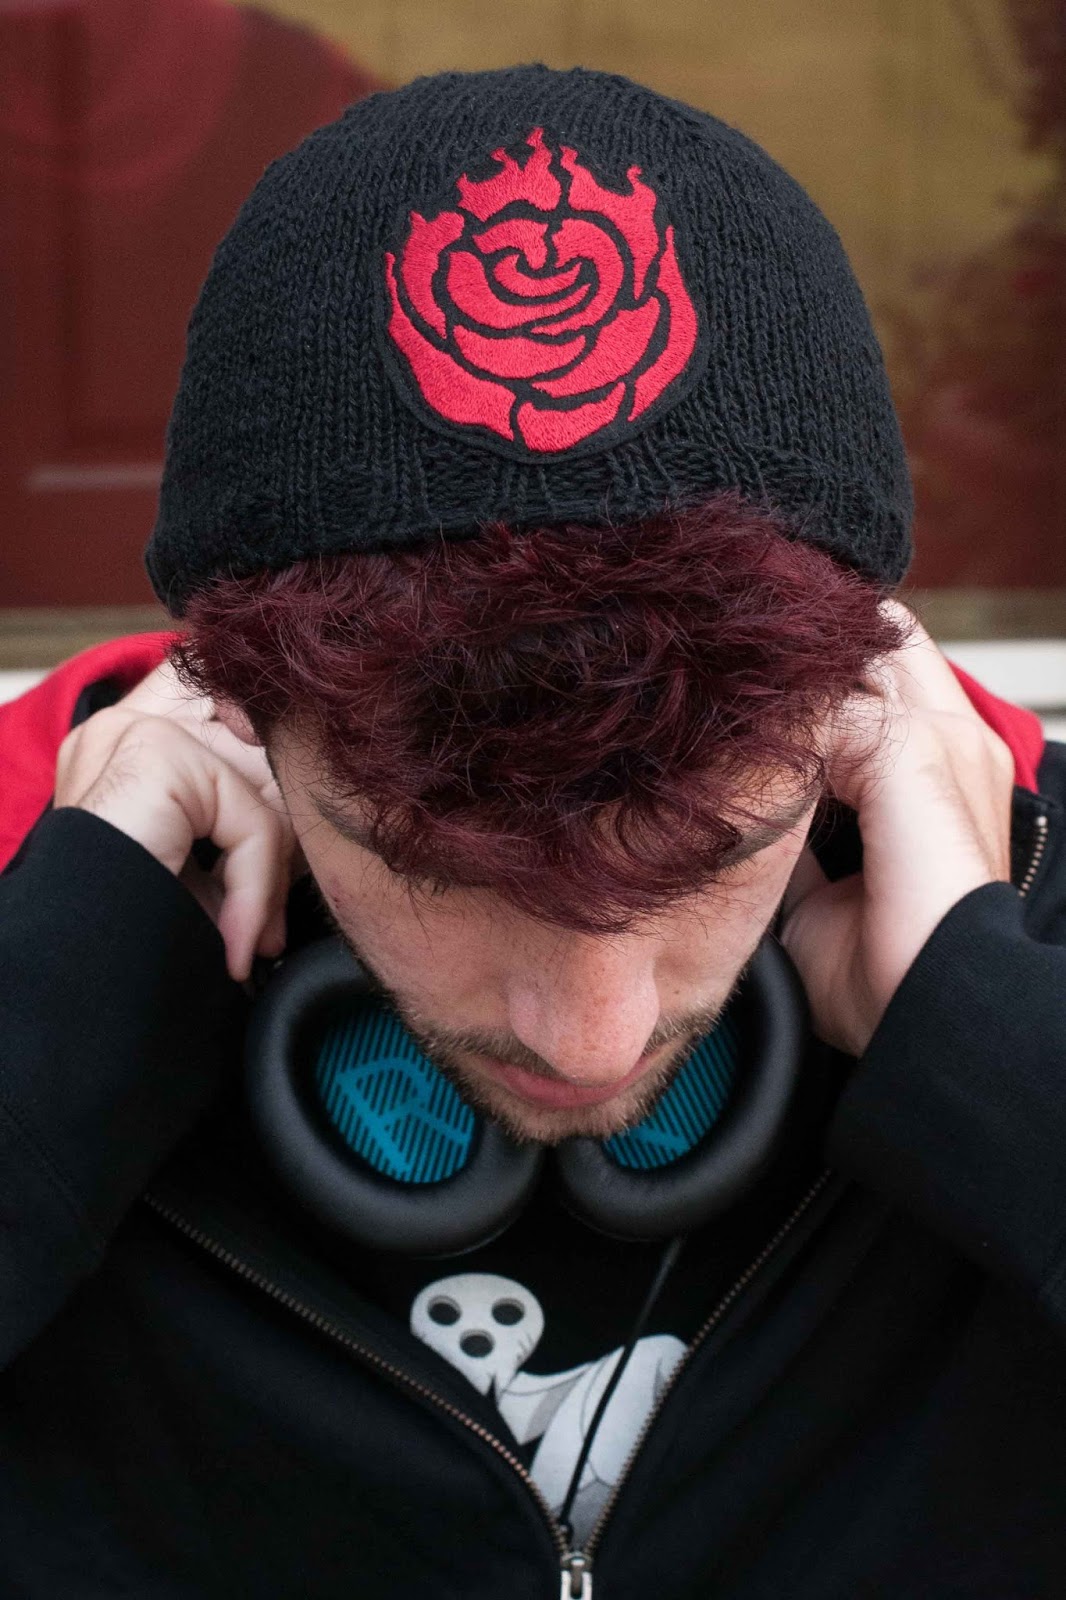
It turns out, Jack is a big fan of a Rooster Teeth animé-style internet show called RWBY (pronounced "ruby") which has four main characters loosely inspired by the classic fairy tale characters and the colors Red,White, Black and Yellow.  Jack's favorite is the red character Ruby Rose who dresses in black with a red-hooded cape...


And whose logo is this trademark fiery rose...


This weekend Jack is going to the Rooster Teeth (RTX) convention in Austin TX with a friend from school.  Lots of attendees dress up as their favorite characters called cosplay.  Jack didn't want to wear a full costume; just wanted to show his support for his favorite character so he requested a hat and hoodie combination.

Jack has taken to wearing a beanie pretty much every day.  It helps to tame his thick hair so I set about to knit him a beanie in a linen/cotton blend for summer wearing...


I used this free pattern from Jared Flood on Ravelry based on a recommendation from Wae at my local knitting store, Cloverhill Yarns.


Since Jack wears his beanie tilted back from the crown of his head, I didn't want too tight of a ribbed band so I used the same needle for the entire hat instead of dropping down three needle sizes as recommended in the pattern.  This was a mistake so I'm going to re-make him one where I only drop down two sizes.

That being said, the hat turned out great and it was the first time I had ever tried the Tubular Cast On.  It makes a wonderful cast on edge for a ribbed band and I'll be using that idea over again.  Highly recommend.


Next up was trying to figure out the best way of transferring the logo to the hat.  I decided against designing a hat with the rose knitted into the pattern (not my forté) and embroidering directly onto the knitted stitches using duplicate stitch wouldn't give me enough detail.

Eventually I decided to embroider the logo onto 100% wool felt.  Since wool felt is expensive, I basted just the amount I needed for my design onto inexpensive muslin and cut away the muslin from the felt...

This is often used when embroidering onto little bits of very expensive materials such as silk gauze where you don't want to waste the fabric by needing to stretch it into a hoop.

Next up, I used my old favorite of tissue paper design transfer.


 I fall back on this method time and time again.
 

It's not the quickest but it allows me more control over the detail of the design transfer.  It also gives me a nice outline for the outside edge of stitches...


I used one strand of Au Ver a Soie silk floss in random long and short stitch with all the stitches directed to the center of the rose...


After I finished the embroidery, I cut it out and appliqued it onto the top of the knitted beanie...


It worked out better than I expected so I would likely use this technique again.

Thursday, June 11, 2015

On Graduation

Graduation has been the theme this week as we celebrated the graduation of two of my nieces from high school...


My oldest niece also graduated this past month receiving her Masters in Library Sciences from the University of Wisconsin.  Though we weren't able to travel to Madison, she was able to come home for her sister's graduation.  She's on the right in the picture below hanging with one of her girlhood friends from the neighborhood...


Of my father's ten grandchildren, that's four down and six more to go.

I've been trying hard to remember what I was feeling when I graduated from high school but I have no clue.

It's a shame we had to rent those white gowns and wear mortarboards that messed up our hair...


The ivory dress, fresh flower look is much more becoming.

I was hoping to have my own graduation from Japanese Embroidery in October.

Unfortunately, I lost a whole month of stitching time with my back problem.  My back is better and I'm heading off to Japanese Embroidery class today so I'm grateful for that.  Oh well, it's never too late if you start today.

Looks like my next target date for graduation will be Fall 2016, life permitting.

Monday, June 8, 2015

Paper Roses

Hello Blog, it's so good to be here again.

After a looong month, I'm finally back in the saddle and have resumed a normal schedule.  Never, ever, ever will I take my back for granted.  As of today, I can sit for longer periods of time and I'm trying to be conscious of taking breaks to stretch and walk.   I'm also back to yoga and swimming and it feels wonderful.  I feel for all those folks who have chronic back problems...now I'm a bit more understanding of what you go through.


Last week, my niece Ellie put on a recital at her school.  After years of performance in theater and in singing groups, she was selected as one of three high school Seniors for the Steward Senior Honors Performance Award.  As part of that award, the recipients prepare all year for a Senior performance recital which was held last week.

It was a bit of a big deal in our family as we've spent many years watching Ellie's performances so we wanted to make her something special to commemorate her big day.

Her middle name is Rose so we gathered together the cousins and set about making her a bouquet of paper roses to be given to her after her recital.


There were many tutorials online for paper flowers but we loved these coffee filter roses on Aunt Peaches blog.

I bought a bag of commercial size filters from the office supply store and used RIT dyes from the craft store in different shades of red, pink and yellow.


It was easy to vary the shade by diluting with water or by dipping the center of the filter in one color and the outside of the filter in another.

I put them in the dryer on air dry.  When they came out they were a wrinkly mess so we straightened them out and sorted them by color and intensity.


The easiest rose was made by cutting the filter into a spiral and then pleating the spiral strip along a piece of masking tape...


Once the strip was pleated, we rolled the pleats around a wire stem to make our roses...


This step took a bit of practice and each person's roses had their own personal flair...


Even Jack's.  In the past year, Jack has become increasingly fond of the color black.  After the girls left he asked if I had any black dye and set about making a black rose for Ellie's bouquet...


We also made a few coffee filter peonies...


And painted a sign...


By the night of the recital, we were all in attendance, flowers at the ready...


She was brilliant.


Of course I'm biased.  I've heard Ellie sing and perform for years but this was the first time that she had the freedom to create her own production.

From the selection of her songs, to the timing of her delivery, to the emotions that she was able to convey through her voice and body language...I was taken on a journey.  And I was very moved by what she had to say...where she had been, were she is now and where she'd like to go.  To me, it was all there...a deep and tender message from her heart...to everyone who heard her perform.  She was more than a singer and more than an actress.  She was an artist and it was beautiful to see.


Afterward, we waited in the lobby for her to come out, bouquet at the ready...


And signs held high...


While we waited, we had time to notice that four of us were wearing striped dresses...


The Star and her Stripes (too bad I didn't think of that picture until now!)

When she arrived, there were enough flowers for Ellie and the arms of her parents...


And we were happy to see that our paper roses held their own when placed near the real thing.

In fact, Ellie didn't even realize they were paper until someone told her.


An everlasting bouquet of roses made by her supporting cast of girl cousins...


and Jack who loves black.

Happy Monday everyone.

Related Posts with Thumbnails