Showing posts with label tools. Show all posts

Thursday, April 23, 2015

A Second Pair of Hands

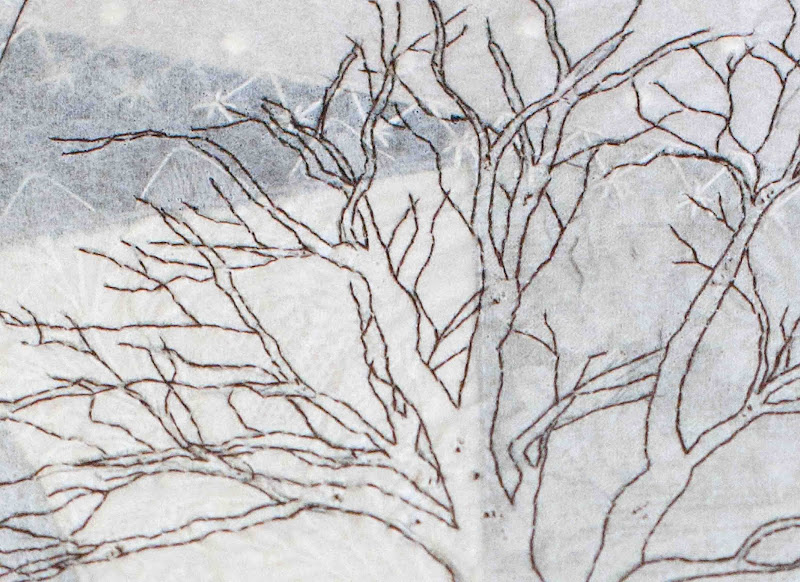
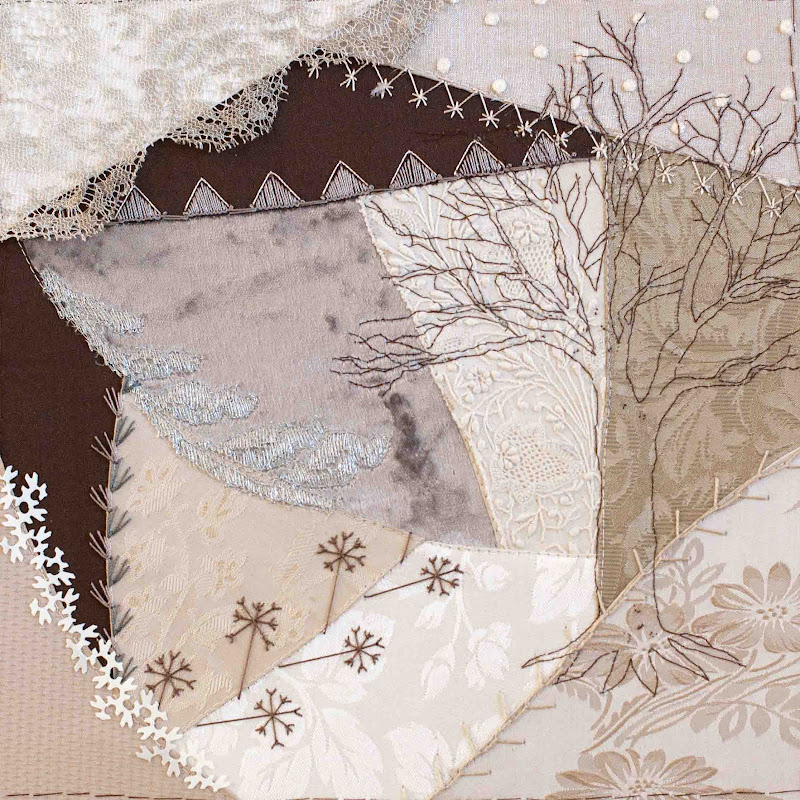
If you had to stitch 118 goldwork leaves on a honeysuckle vine, how many leaves do you think it would take before you felt like they began to flow from your needle?


All of the leaves on this honeysuckle vine have a very predictable shape so it shouldn't take too long, right?

Oh, if it were only that easy.  There are so many variables to account for and I am only now beginning to find a rhythm...on leaf number 86.

Working with Japanese gold thread, couching stitches every 2mm or so, maintaining the twist of the gold, manipulating the koma in a predictable and practiced way, making good corners, etc.


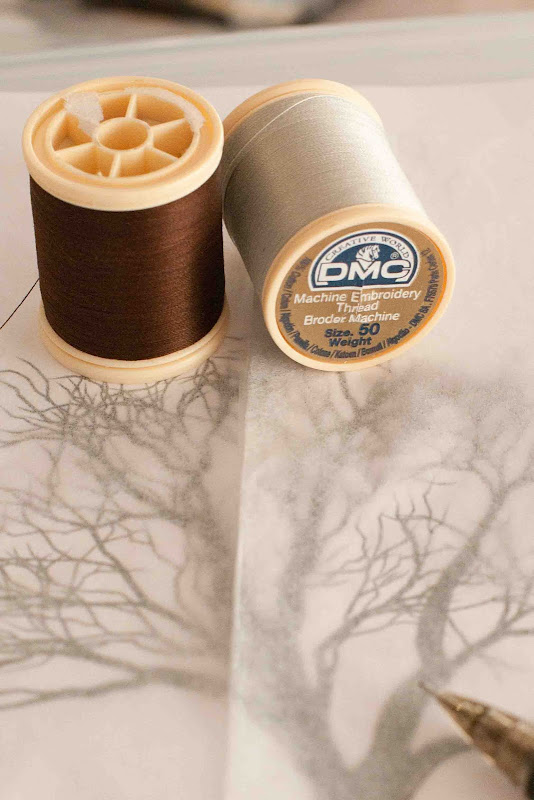
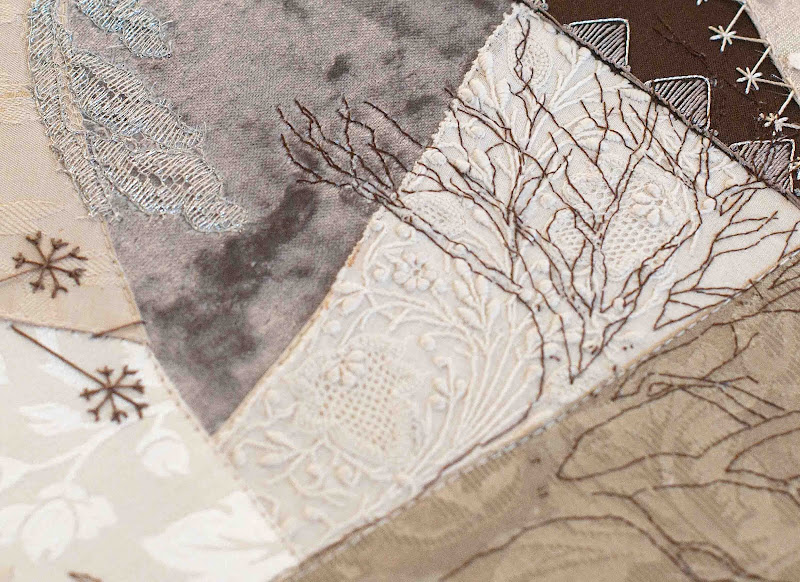
There's a lot to understand.  First, the thread.

Japanese gold thread comes in a hank and it must be split in half and wound onto two wooden spools called koma.  It is very important that the thread be wound onto the spool under tension.  I am using size number 3 and it's imitation gold...


To understand the importance of having the thread under tension, you have to understand how the thread is made.  Gold (real or imitation) is laminated to mulberry paper, cut into strips and then wrapped around a silk core.


While stitching, the wraps can become loose allowing more of the silk core to show through.  This also makes the thread less taut and more wimpy.

Here is a picture of the gold thread that has loosened near the cut end...


It's not the greatest picture but you can see the lines along the thread where a bit of the silk core is visible.

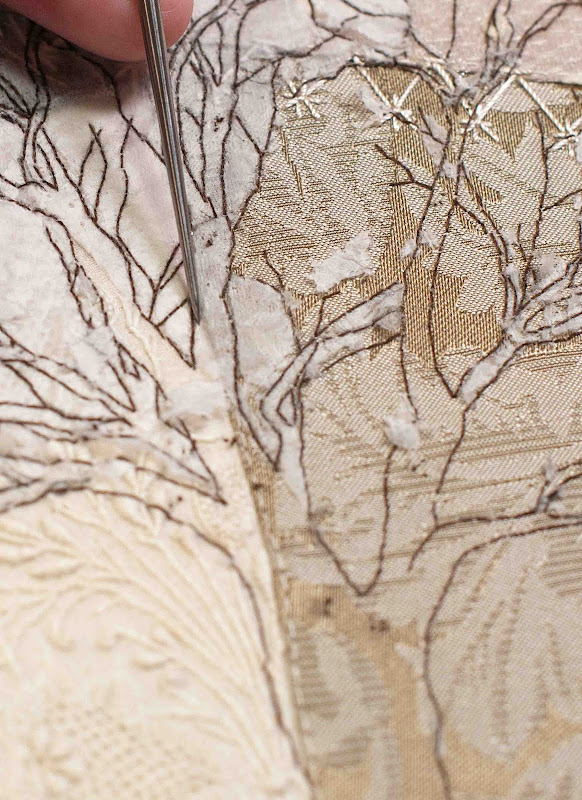
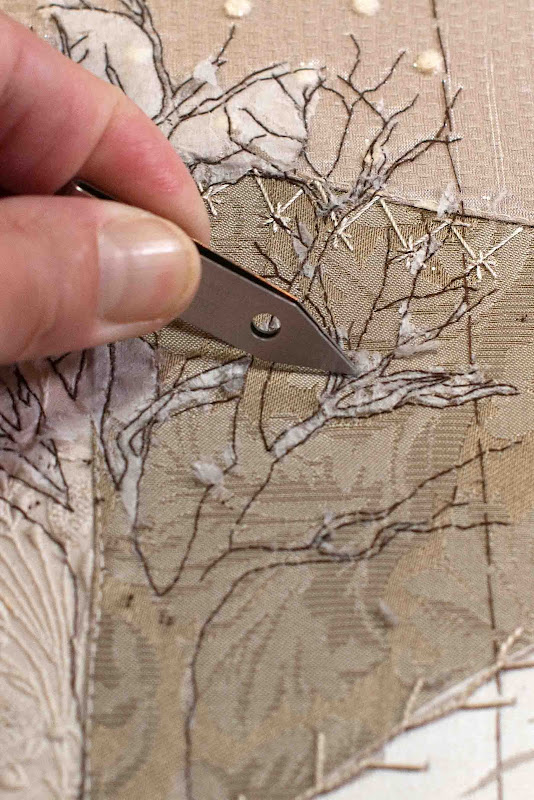
By winding the koma, I can tighten and untighten the twist of the thread.  In the picture below, I have tightened the gold thread; the wraps are closer together and the thread takes on a wire-like quality.


This is how you want the thread to be when you couch it down.  The gold thread shines to optimal effect when the thread is laid this way.

That being said, to turn corners the thread needs to be softened in order to make sharp points and corners.  My honeysuckle leaves don't require as sharp a corners as my cherry blossom petals but I still have many corners to turn.  Softening the twist of the gold at the turn keeps the thread from crimping.  Once I've made the turn, I have to retighten the twist of the thread again and off I go to the next turn.

This means that there is a constant manipulation of the thread wrapped around the koma as I stitch.  Wrapping to tighten the thread, couching the thread, and then loosening the wraps at the corner to allow for an easier turn, and then tightening the thread again to couch down the straightaway section of the leaf.


This dance of the koma, together with the starting and ending the threads for each leaf, means that each leaf can take a good deal of time.  For me, about 22 minutes.  (*wink* That's what that Toggl timer is for).

Next Japanese embroidery post, I'll try to post some pictures of turning corners since a few of you have asked about that.

Needless to say, these koma are very handy tools and I use them anytime I need to couch a non-stitchable thread on a project.  This extra set of hands allows you to keep your thread under good tension so that the couched line is nice and smooth.

Koma are most often sold in pairs and can be made from a variety of woods.  The most important thing when selecting koma is the weight of the wood that is used.  The heavier the better.


The weight plus the squared off ends keeps the spool from rolling and helps to anchor the koma firmly in place.  They really are like a second pair of hands.

You can buy koma from the Japanese embroidery center here .


But don't expect to master their use overnight.

Hundreds of curlicues...118 leaves, and hundreds more turns...

Practice is the teacher.  


That's one thing that the Japanese understand.  Ten phases to teach you.  To test you.  And then you are ready to begin.  

The hardest part for me is staying in the chair.  Resisting the temptation to do something else.  And no, it doesn't get easier. 

Showing up.  Sitting down.  Keeping my butt in the chair.  Stitching for a minimum of two hours every day.  

It's starting to happen.  Competence.  Predictability.  Flow.

The Japanese understand that there are no short cuts to gaining skill.  It's work; it can be hard.

I'm getting better at the struggle.  I'm winning more and more.  My butt is staying in the chair.

Wednesday, February 25, 2015

Spool Hands

Has this ever happened to you?


It looks like the spool dropped its drawers, doesn't it.

Well, look what I found at the fly fishing store...


These little elastic spool huggers.

They're called Spool Hands and they were invited by a guy named Bob Sutherland in 2003.

Not only do they keep unruly threads and wire from running amok, but they also have this nifty grommet opening which allows you to dispense a length of thread or wire as you need it.


No re-winding spools or trying to secure your thread while you work.

It really is a time saver and the best little invention ever!  It's right up there with the Uncle Bill's tweezers I posted about the other day.

I bought mine online from J. Stockard Fly Fishing and they're currently on sale.

Maybe Bob and Uncle Bill knew each other!

I'm getting ready to go into mass leaf production for Mrs. Rose's roses...


My leaf palette of Gloriana Tudor Silks arrived the other day from Needle in a Haystack so I'm all set.  I'll be away from my Japanese embroidery frame for the next few days so I'll be leafing instead.


Maybe the trees around here will get the message and push for Spring.

Happy Nifty Gadget Day!

Wednesday, February 18, 2015

Tracking Time

I am long on ideas and short on time.  I only expect to live 100 years.  

Thomas Edison said that but it might as well have been me.  I have been trying to create more time in my creative life... 


Deadlines help.  Alot.  I have three pieces of Japanese embroidery to complete by October which is no small feat.

I've committed to stitching two hours per day to accomplish that goal.  The intention alone has helped to improve the total amount of time I spend stitching.  I wake up early on days when I know I'll be busy or I stay at the frame longer one day if I know I won't be able to find time to embroider the next.

I also got myself a buddy...a fellow student in my class who is also trying to graduate in October.  We text each other to support one another and help keep ourselves on track.

Both of those things have helped my productivity but the tool I started using over the weekend has been a total game changer.  I am loving it and I just have to share.

It's a time-tracking app on my iPhone called Toggl.


You can download it for free from the App store.  Like many apps, they have a more robust application that you pay for but the simple one is working quite well for me.


Many of my fellow Japanese embroiderers track the time it takes to stitch their pieces, some for insurance purposes.  I am often asked by friends how long a project takes me to stitch and I usually have no good answer.  Well folks, those days are over!

Over the weekend I went looking for an app that could keep track of my time across all my projects.  I found this article which reviewed a number of apps...many of them were for tracking billable time or invoicing...neither of which I needed.  I narrowed my choices down to two, ATracker and Toggl, and found that I liked Toggl best.

When you first open the app, you press the timer "Start" which takes you to a screen to designate your project.  Below I have Sake Box listed but I could add a New Project if I was starting one...


Once I touched Sake Box, I'm asked "What are you working on?"


I've been entering "Goldwork" because I would eventually like to know how long the Goldwork takes me.


Here you can see the cumulative totals I've spent on Sake Box - Goldwork over the course of a few days...


Toggl will track your total time by week, month, year and its reports feature lets you look at total time spent by project.

I am absolutely thrilled with this new tool...I just might have to add my iPhone to my list of essential needlework tools.

I hope this helps you find time for your own projects.

Have a good Time!

P.S. Thanks to onthevergeofsnapping and Andrea D for finding these two articles about Uncle Bill and his tweezer invention: here and here.    I found it fascinating in this story that Uncle Bill's tweezers almost didn't get made.

Monday, February 16, 2015

Thank You Uncle Bill!

Today I'm sending out a huge thank you to a guy that I don't even know exists...


Is there really an Uncle Bill who invented these tweezers??

These little tweezers live up to their slogan...


And they are one of the simplest and most useful tools you can own.  Not just for embroidery either...for any tedious task.

I bought multiple pairs to keep with my Japanese embroidery, at my work station and an extra for carrying around with various projects.

This past weekend I used them to remove the tiny bits that remain after removing my paper transfer pattern.


First I used the tekobari to score the paper on either side of each stitched line.  This helps the paper to tear away more easily.


Inevitably, little bits of paper are stuck under stitches and need to be removed...


The precision-point sliver grippers are THE tool for that job.

Right after the needlebook, scissors and tekobari...these are my fourth most valuable tool.  I use them to sink goldwork, for picking out stitches, for removing errant hairs and debris from needlework, etc...

Many of you out there are already Uncle Bill enthusiasts but if you didn't know about them until today, you can get them here.

I went searching for some background history on Uncle Bill but couldn't find any.  I only know that they are manufactured in the USA by this company in Connecticut.

Happy precision picking everyone!

Friday, March 22, 2013

A Precious Needle

At my last Japanese embroidery class, I discovered I had a treasure in my tool box...


It's  placed in a special place on my needle felt above, the bottom left.

It's a round-eyed, handmade Japanese embroidery needle used for stitching twisted threads.


They are not made by hand anymore.  The man that used to make them died and there was no one there to learn his craft.

They have a round eye because the shaft of the needle is of equal width for the entire length of the needle except for the little bit around the eye.  You can see it below on the side view.

The needle maker would have taken a hammer and tapped just the tip of the needle where the eye was to flatten it.


This needle keeps the fabric open longer than the flatter-eyed needle on the right to allow for the passing of the twisted thread through the fabric.

It's a precious needle.  No longer made anymore.

To me, it's worthy of finding someone to pass it on to when I leave this earth.

Who would of thought that something so small could be so precious.

Happy day to you all.

Wednesday, October 31, 2012

Rest in Peace

Heather M. of In Love With Threads was inspired by the Hari-kuyo needlebook to make this final resting place for dead needles...


A steampunk-inspired coffin.

Old, gold silk and copper gears with embroidered bullions...


Finished beautifully into this miniature box...


It's only 3" tall x 2" wide!

I loved it so much that I bought it for Irene.  Though she doesn't know it yet.  (ahem. hi Irene.  I have a present for you.)

It seems to me like Heather and Irene had similar ideas for their broken needles.  (I shared Irene's needlebook last post...here.)


So I'd like to get Heather's coffin together with Irene's needlebook.

Who knows.  Something very creative might come from a coffin full of broken needles.

And should you think that a coffin isn't necessarily the gentlest place for a tired and broken needle to rest.  Well, this is no pine box.  Heather lined this casket with velvet...


Nothing but the best for our beloved dead needles.

Happy Halloween everyone.

May your broken needles...rest in peace.

P.S.  You can visit Heather's blog here.  And her Etsy shop here.  Thank you Heather, for a great idea.

Note:  This post was pre-scheduled before Hurricane Sandy hit, in anticipation of my loss of power.  It seems a little trivial at this point given the devastation and loss experienced by those in New York, New Jersey and other areas in the Northeast. Sending love and support to all our friends who were affected.

Tuesday, October 16, 2012

Wardrobe Wish List for Winter Stitching

On the East Coast of the United States, winter is knocking at our door.

And so my thoughts turn to the proper outfit for winter stitching.  

Let's be honest.  Sitting still, stitching quietly through the winter months, hour after hour, is a chilly proposition.


What makes it worse is that we keep our house at a chill 58°F (14°C)...

When we bought our house, we bought a home big enough for four children.  We had one.  That means we have more room than we need and it seems such a waste to heat the whole place.

When I lived in a Japanese apartment, only one room was heated.  This room was closed off from the rest of the house and if you needed to use the other areas...the toilet seat was heated, the bathtub had a heater to keep the water at a constant temperature, and the bedroom wasn't heated because you slept under a futon made from down.


It really makes a lot of sense to live that way.

And so we started dropping the temperature on the thermostat a couple of degrees over a period of a few winters.

Once we started saving hundreds of dollars on our heating bills, it was hard not to continue.   Our bodies have adjusted to the cold.  Our skin doesn't dry out or flake, my fingers don't split, we sleep better and we've grown very fond of our afghans and Cozies.

But don't worry.  If you come to visit, we'll turn up the heat for you.

All that chatter is just background to explain why what I wear for winter stitching is so important.  Though I have a space heater in the room, I still need to dress for the job...many hours of sitting still in a pretty cold room

At this point, there will be some of you who may live similarly and others who think I'm completely nuts.  My Dad falls into the latter category.

Regardless...Here's my Wardrobe Wish List for Winter Stitching in a Deep-Freeze Environment:

Fleece-lined yoga pants from Title Nine:


By far, yoga pants are the most comfortable pants to wear when I have to sit for hours.   Only problem is that they are too thin to keep the legs and bum warm in the winter.  I was thrilled to find these fleece-lined winter pants at Title Nine for $85.  A little pricey but they're paid for with only one month savings on the heating bill and if you wear them every day, they might be worth it!

The next item was not so easy for me to find.

When I stitch, I want very little to no bulk from my wrist to elbow.   Bulky clothes rub against stitching, get snagged on beads and metal threads and get in the way when my hands move back and forth over the frame.  No-bulk sleeves are hard to accomplish in the winter and still stay warm.

Enter this arms-free sweater from Anthropologie:


I have been searching capelet and shawl patterns for years for something like this.  It needs to leave the arms free, have a closure and provide enough warmth to the torso.  This sweater fits the bill.  If anyone knows of a pattern for something similar I would be very grateful for the reference.  I've scoured the patterns on Ravelry and come up with nothing.

Fingerless gloves from Soul Role on Etsy:


Though I love hand-knitted fingerless gloves, they also give too much bulk for embroidering at a frame.  I really like these fingerless organic cotton/lycra versions because they are thin and they are washable.   Washability is key in keeping the embroidery clean as the gloves are worn day after day.

Lastly, I usually have a microwaveable Cozy sitting in my lap and warm socks and wool clogs on my feet.  

What are your tricks for warming your winter stitching?

Thursday, May 10, 2012

Cool Little Spool Tool

Remember my framing needle friend, Terri, whom I mentioned in my last post and who framed my Breakfast at Tiffany's piece?

Well, while I was at Terri's, we had to re-lace a certain section of the piece.  Since Terri is a framer and an embroiderer, she tends to lace a LOT of needlework.

And she uses this nifty little spool holder that her Dad made to hold her lacing thread...


When lacing, I have always tried to guess the amount of thread I would need to lace a piece.  Then I would reel off an estimated amount, usually yards long.  I would cut the thread and then pull the entire length of the thread through the piece using big arm motions.  Often, the thread would end up a tangled mess or get caught up on something despite my best efforts.

Enter Terri's little spool holder.  Terri threads her needle and and begins lacing one side...when she reaches the other side, she ties off the thread and then goes back to tighten all the laces.  Then you can cut the thread...exactly where you need to and there's very little tangling of thread and gnashing of teeth.


I've laced a lot of pieces in my life and I had never learned this method. Soo...maybe there's someone else out there besides me who might be helped by Terri's method. 
 

Thanks to Terri and her Dad for the gift of my own lacing spool. I just used it today and it's a HUGE improvement over my old method.

Tuesday, February 21, 2012

Tissue Transfer

We had a nice long holiday weekend and I did find some time to work on my January block. I really am trying to get this finished up soon but some things can't be rushed.

Like tissue transfer...


Though there are many methods of transferring embroidery patterns to fabric, tissue transfer is the method I use most.

It allows me more precision in the transfer and position of the design and is the most versatile of all methods. The downside is it does take a bit more time.

I first learned the discipline of tissue transfer in Japanese embroidery. Having only embroidered on pre-stamped fabrics previously, I didn't have much experience in transferring my own designs and I remember feeling the process was fairly onerous when I first learned it.

In this picture you can see how tissue was used to transfer a pattern on top of a base layer of satin stitching. The transfer line then serves as a guideline to couch the goldwork on top and the result is stunning.


Today, what I once thought was a bit onerous is now just another tool in my toolbox and part of my workflow.

As usual, it's good to start with the right tools...


You can use any tissue really but you'll find some tear away more easily than others. In my experience, the cheaper tissues are better for this.

I also use a small sharps needle and a very small thread. Sewing thread will work but it's still thicker than I like. I use DMC's machine embroidery thread but any size 50 thread weight will do...


After transferring the design with 0.7mm mechanical pencil, I then backstitch around the entire pattern taking fairly small stitches of about 1/8". (If I'm doing curves, I'll use a line of held thread instead of back stitch but that's a discussion for another day...)

The size of your needle really is important. The smaller the needle, the less you'll tear the tissue and distort your penciled design.


After stitching is complete, I use my favorite laying tool, my handmade Japanese tekobari. Again, that's a subject for another day just suffice it to say that it is a multi-purpose player in the toolbox and I use it to score the tissue on each side of the backstitches all the way around the design. Minus a tekobari *wink*, you can use a large sharp chenille needle, awl or anything with a good point...


This makes the lifting away of the tissue MUCH easier. Score first, then tear.

Undoubtedly, there will many tiny bits of tissue stuck between stitches...particularly when you have tiny branches etc.

That's when Uncle Bill's Precision Gripper Tweezers come in handy to make quick work of picking out all the fluff. You can use any tweezers but these little guys are my fave for this task...


A magnifier and good light doesn't hurt here either.

When finished, the design is transferred and ready to stitch.


It's a terrific method for use in crazy quilting where layering motifs over fabrics and seam treatments is commonplace.

In my block, you can see that I've placed a part of the tree over a pre-embroidered needle lace cuff, seam treatments, and different fabric types...even velvet...


The only way to get the transfer over top of all that texture in an accurate manner, is tissue transfer so I hope you'll try it.

I'm off to finish up preparations for my Hari-kuyo Needlebook E-course which begins tomorrow!

There's still plenty of time to join in the fun and make your own book of needles. Though the full kits are sold out, I do have some felt pages and needle labels remaining but they are going fast...

Have a great day everyone. See you next time!

Related Posts with Thumbnails