Showing posts with label tips. Show all posts

Monday, May 11, 2015

A Tip from Jan at Delectable Mountain Cloth

Good Monday!

I'm still out of commission with my back but I'm a bit better than I was a few days ago so thanks for all the well wishes.  I'm going to have to figure out an ergonomic chair that can pull up to my embroidery frame so if anyone has any advice...I'm all ears!!

Here's a picture full of happiness...


This is my loot from my trip to Delectable Mountain Cloth.   I just love that crocheted and beaded berry trim.  *Sorry but there was only this one piece.* (I know, I know.  Don't be mad.)

It reminded me of this book with beaded edgings that I bought a while back.  Time to try out some of those patterns.

I also was really into the color nude this time around for some reason.


These silks have great structure and a stiffness which I'm looking forward to playing with. That's another thing about Jan's shop...there are tons of different types of fabric...the common denominator being that they are all natural materials...silks, cottons, linens, wool.

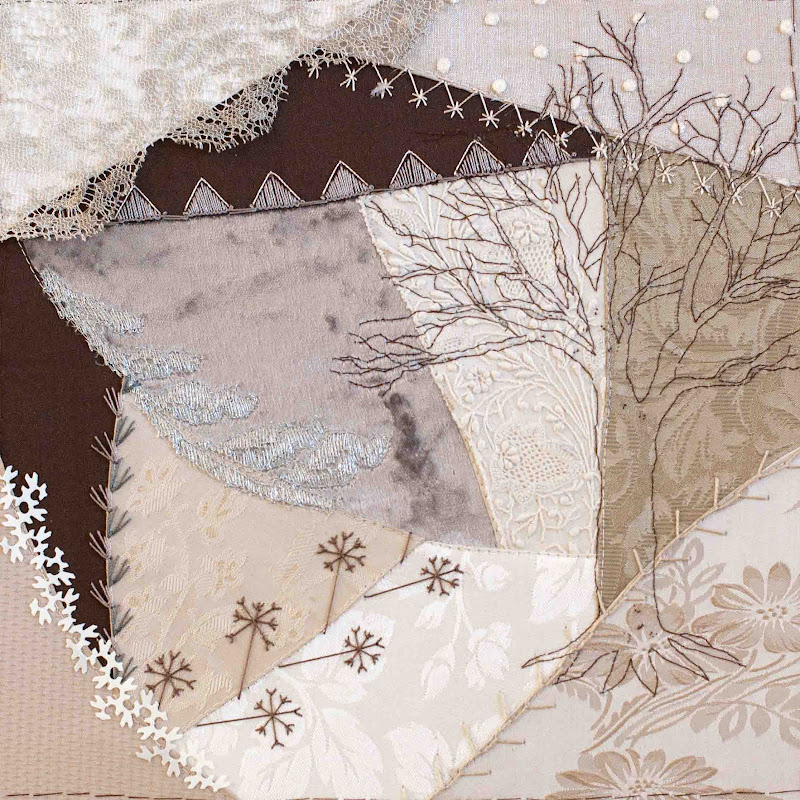
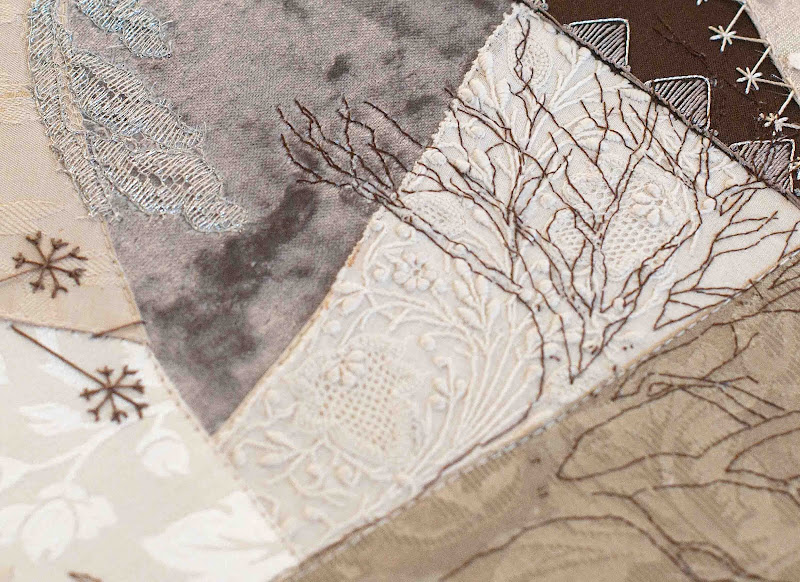
I also can't resist the incredible quilt packs that Jan puts together.  There are approximately 30-40 fabric pieces per roll, perfectly sized for piecing crazy quilt blocks.


The fabrics are unbelievable...running anywhere from $25-over $100/yd and priced incredibly reasonably.  There's no way you could afford to purchase such a wide range of exquisite fabric.  I can't get enough of them.

Lastly, I picked up some of this icy blue panne velvet.


Panne velvet is a type of crushed velvet where all the nap is hard pressed to one side.  The overall effect on the velvet is very glossy and looks like sealskin.

What if you don't want this glossy look?

No problem.  According to Jan, all you have to do is wet the velvet and put it into the dryer.

So I tried it.  I wetted it...


And dried it. Now I have two different types of velvet.  One very icy and slinky and the other very soft and malleable.


I noticed that the wetted version also doesn't hold creases like the panne velvet does.

And there you have it.  A tip for panne velvet on this beautiful Monday.

*sigh***


P.S. Unbeknownst to me, Delectable Mountain is a quilt block pattern! Maybe that was unbeknownst to you too...

Tuesday, February 21, 2012

Tissue Transfer

We had a nice long holiday weekend and I did find some time to work on my January block. I really am trying to get this finished up soon but some things can't be rushed.

Like tissue transfer...


Though there are many methods of transferring embroidery patterns to fabric, tissue transfer is the method I use most.

It allows me more precision in the transfer and position of the design and is the most versatile of all methods. The downside is it does take a bit more time.

I first learned the discipline of tissue transfer in Japanese embroidery. Having only embroidered on pre-stamped fabrics previously, I didn't have much experience in transferring my own designs and I remember feeling the process was fairly onerous when I first learned it.

In this picture you can see how tissue was used to transfer a pattern on top of a base layer of satin stitching. The transfer line then serves as a guideline to couch the goldwork on top and the result is stunning.


Today, what I once thought was a bit onerous is now just another tool in my toolbox and part of my workflow.

As usual, it's good to start with the right tools...


You can use any tissue really but you'll find some tear away more easily than others. In my experience, the cheaper tissues are better for this.

I also use a small sharps needle and a very small thread. Sewing thread will work but it's still thicker than I like. I use DMC's machine embroidery thread but any size 50 thread weight will do...


After transferring the design with 0.7mm mechanical pencil, I then backstitch around the entire pattern taking fairly small stitches of about 1/8". (If I'm doing curves, I'll use a line of held thread instead of back stitch but that's a discussion for another day...)

The size of your needle really is important. The smaller the needle, the less you'll tear the tissue and distort your penciled design.


After stitching is complete, I use my favorite laying tool, my handmade Japanese tekobari. Again, that's a subject for another day just suffice it to say that it is a multi-purpose player in the toolbox and I use it to score the tissue on each side of the backstitches all the way around the design. Minus a tekobari *wink*, you can use a large sharp chenille needle, awl or anything with a good point...


This makes the lifting away of the tissue MUCH easier. Score first, then tear.

Undoubtedly, there will many tiny bits of tissue stuck between stitches...particularly when you have tiny branches etc.

That's when Uncle Bill's Precision Gripper Tweezers come in handy to make quick work of picking out all the fluff. You can use any tweezers but these little guys are my fave for this task...


A magnifier and good light doesn't hurt here either.

When finished, the design is transferred and ready to stitch.


It's a terrific method for use in crazy quilting where layering motifs over fabrics and seam treatments is commonplace.

In my block, you can see that I've placed a part of the tree over a pre-embroidered needle lace cuff, seam treatments, and different fabric types...even velvet...


The only way to get the transfer over top of all that texture in an accurate manner, is tissue transfer so I hope you'll try it.

I'm off to finish up preparations for my Hari-kuyo Needlebook E-course which begins tomorrow!

There's still plenty of time to join in the fun and make your own book of needles. Though the full kits are sold out, I do have some felt pages and needle labels remaining but they are going fast...

Have a great day everyone. See you next time!

Tuesday, November 1, 2011

Tips for Stitching in Low-Light

It's a gray morning.


And thanks to this gray morning, I have experienced a wonderful aha moment --

For my non-English speaking friends, an aha moment is an instant at which the solution to a problem becomes clear.

And it's a discovery so useful that I just have to share.

A discovery resulting from the collision of two worlds -- stitching and photography.

Currently, I am in the midst of taking a photography course on Shooting in Low Light from my all-time favorite photography mentor, Karen Russell. I love how Karen's photography tells a story...how she shoots in real-life situations...how's she's got a very very busy life but still manages to take beautiful photographs.

One of the toughest situations for a photographer is taking great photographs in low light (without a flash)...and yet, we're in low light all the time. Let's face it, we're probably in low light more often than we're in perfect natural light conditions...and taking great pictures in low light settings requires a greater knowledge of all the variables that influence the photograph.

Likewise, having or, should I say not having, great light also influences the quality of our stitching. Throw in poor eyesight and adequate light becomes even more important.

From experience, I have discovered the best light for embroidery comes from southern facing windows...it's why my dining room is no longer a dining room and has become my primary place to stitch in my home.

I have also learned that the best time of day for light in this room is the first few hours of daylight. That's magic stitching time for me. It's why my blog posts are always later in the day. Stitch first, post later.

Why?

Not only is the light great at that time of day, it's also because the angle of light at that time of day gives the added benefit of sidelights.

Sidelights are lights that come from the side, illuminating three-dimensional stitching and helping to eliminate stitch shadows.

If you've ever tried to couch wires for stumpwork, couch gold thread in goldwork, stitch fuzzy technique in Japanese embroidery or do any type of small embroidery work...sidelights are critical.

When natural light is unavailable (it's night or we have a rainy, gray day), we are forced to use artificial light. There are many wonderful stitching lights out on the market and it's important to have one that mimics daylight.

That being said, more often than not those lights are overhead lights ergo they cause shadows on our work. Lights with a flexible arm are handy since you can manipulate the position of the light to help reduce shadow. I also use two lights to help accomplish this as well.


So, here I am stitching with my two lights on a gray day and listening to my photography class when I hear Karen say that the harshest light for indoor photography is overhead lighting; it creates shadows under the brows, nose and chin. Better to turn on all your lamps instead...this reduces those overhead shadows.

Eureka. Same goes for our needlework.

I did a little test since it was gray this morning...Using my macro lens and controlling for as many factors as possible, I took this picture of what my stumpwork petals look like with just my overhead Ott-lites...


Can you see the bit of shadow under the wire?


That shadow can prevent me from placing my needle in the right spot so that my stitches lay evenly side by side.

When couching wire in stumpwork, you learn pretty quickly that a nice clean edge is really important when you finally cut out the petals from the ground fabric. It keeps you from having a "fuzzy" edge or from cutting a misplaced couching thread by accident...though trust me, that still happens!

In the next picture, I used a big white sheet of foam board as a side "reflector" to try to eliminate some of that overhead shadow I was getting on the underside of the wire.


Though it may be tough to see the difference in my photographs, I took the liberty of doing a color sample in Photoshop of the exact same area under the wire in both pics. Here's the color difference.


I am convinced that sidelights work.

So...beyond having a great stitching light, what else can we do to improve the light for stitching and to create more sidelights??

Well, I am in no way a lighting expert, but I have spent many hours at my stitching frame in all types of lighting situations and here's what I know at this point on my journey...

Tips for Improving the Quality of Light when Stitching Inside, in Low Light, or on a Gray Day
  1. Purchase a great light with magnification. (Trish Burr has a recent post on her blog which you can read here.)
  2. Consider working with two stitching lamps so you can increase the overall illumination of your work.
  3. Stitch near a window with southern exposure.
  4. Open any window shades or doors to increase the amount of outside light into your stitching room.
  5. Turn on any other ancillary lamps and overhead lights to increase the overall light in your room.
  6. Wear a white shirt. The color white reflects light significantly more than dark colors. Signficantly. Sounds silly, but it works.
  7. Work in a room with white or light colored walls. Again, white is reflective so working in a room with white or light-colored walls will improve the amount of light on your work dramatically over working in a darkly-painted or darkly-paneled room.
  8. Consider setting up a few white boards or mirrors on either side of your frame to increase the potential for greater sidelights.
  9. Addendum from Kathy: Plan to put really light window coverings in your stitching rooms. If it's a really gray day, consider closing all the drapes if you have white or light colored curtains or drapes. The reflected light from them may be brighter than the light coming in through the windows. This is also important when stitching at night.
  10. Purchase white lampshades instead of colored ones.
That's all I've got for today. I hope these tips help you see your work a little better.

Myself, I had never thought about wearing white, working in a room with light colored walls or using mirrors to reflect light...until I started my course with Karen.

I have made some changes myself and have noticed a big difference. Especially on a gray day.

May the light be with you...

Saturday, March 7, 2009

Spring Forward


Where I live, tonight is the night we turn our clocks forward one hour -- and lose an hour of sleep!

This weekend, I'm working on my February BJP and finishing up this little Spring project. I used colored chalk that I had bought for scrapbooking to give the embroidery a little pop! I didn't want to use dye or paint and I found that the chalk worked very well.

I also discovered these wonderful little tools from the Asian market near my house. My husband brought these home thinking they were toothpicks.


Though they ARE made to be used to clean the spaces between your teeth, they have tiny brushes on both ends!! One side is stiff like a stencil brush; the other side is flexible...And for $2.99 -- I think it comes out to about 2 cents per little brush.

And, oh the uses!!! Brushing on small bits of paint or glue -- in my case, chalk... They're just fabulous for so many things...

On the other hand, my husband doesn't like change and refuses to use these in place of a good old-fashioned toothpick. Lucky for me -- they now live in my craft supplies...

Related Posts with Thumbnails