Showing posts with label finishing. Show all posts

Tuesday, May 8, 2012

Finished Traveling

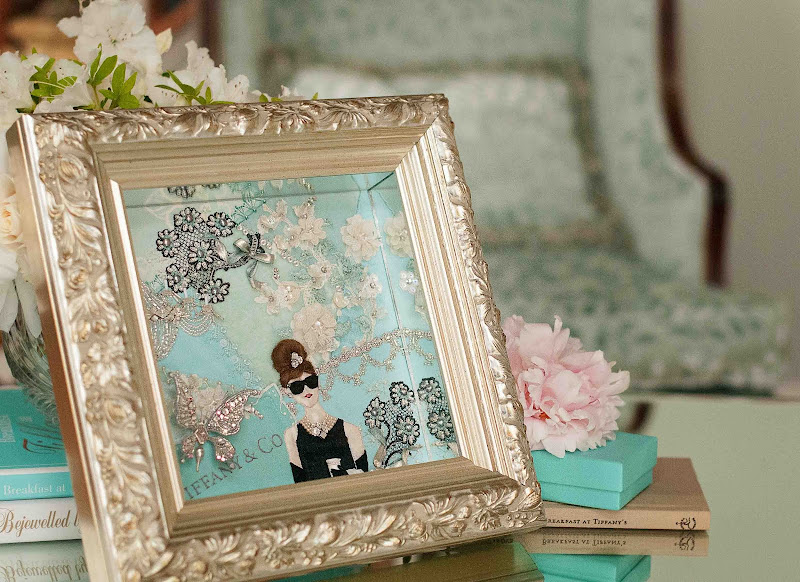
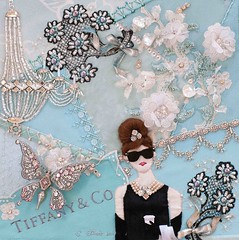
A few months ago my local Embroiderers' Guild asked me to give a talk about the inspiration behind and the development of my Breakfast at Tiffany's-inspired embroidery, Traveling.


So yesterday, I put on my black dress and my mother's pearls, and headed off with my slideshow to share my story.  Most of my guild members are not online and do not read blogs so they had never heard the stories that I had shared here on this blog.

One of my guild members, Terri Tubergen, is also a framer.  Terri does excellent work and, when I asked her if she could line the edges of the shadow box with mirror, she didn't hesitate to say she would try.

So yesterday was my first chance to see the final framed piece...and I was thrilled!


I had wanted the piece to resemble the mirror-lined jewelry cases within the Tiffany store itself.
Remember I was worried that I needed to extend the piece with ribbon? And so I traveled to New York to find something?


It turns out, I ended up not using the ribbon I purchased anyway.  It placed the mirror too far away from the work so the mirror was unable to reflect the three-dimensionality of the embroidery like I had envisioned.


We decided to go for it and rest the mirror edges right at the seam allowance.  I was still a bit worried that the mirror sides might overshadow the piece inside.

I'm happy to report that this didn't happen at all.  In fact, the mirrors reflect light to the sides of the three-dimensional components as I had hoped they would.  


I love it!  And it's just too dag-on pretty not to share.

And poor Terri.  

I'm afraid there will be more mirror boxes in her future.  I'm thinking of framing January Reflections the same way.

Furthermore, it got me thinking...This approach would make a great glass table top with embroidery underneath. 

All in all, it sure feels good to have it all finish up so nicely.   And so much fun to share it all with my needle friends.


Happy day everyone!

Friday, February 17, 2012

A Special Shopping Trip

It's not uncommon for people to travel to New York to go shopping for a wedding dress, for an engagement ring or for other special occasions.


Me? I happen to go there to look for the perfect sewing trim for a special piece of needlework.

Luckily, I live 3 1/2 hours by bus from NYC and its Garment District.

So yesterday, my friend Helen and I traveled to New York to find just the right ribbon to help me frame Audrey.


When I first pieced the block that became Breakfast at Tiffany's, it was years ago and I was just starting to crazy quilt.

At the time, I had no idea that this block would become the base for a chandelier, lace stumpwork flowers, a butterfly and for Audrey herself. I made the mistake of not giving myself enough of a seam allowance around the edge of my piecing...


I have a dream of framing this piece in a shadowbox...with the shadowbox "sides" being made of mirror.

My hope is that the mirror will reflect the light and will highlight the three-dimensionality of the needlework...


I can't put the mirror directly onto the edge of the embroidery or the frame will overshadow the stitched area...so I set out to New York to find a wide ribbon I could add around the edge of the work to extend it.

Convinced I would have lots of choices, we went to Mokuba first.


The only ribbon I found there that might work was this velvet...


I left Mokuba liking it, but not sure if it was the right thing...

Next stop was Tinsel Trading...


Tinsel Trading is a feast for the senses selling both contemporary and vintage millinery, ribbons, trims and other fripperies.


It just seems to get better and better there. I love it all but I'm particularly attracted to their special area of expertise, vintage metal ribbons...


Metal trims....


Metal fabrics...


And metal threads.


Most of the items were manufactured in France in the 1930s and are not being made anymore. You can read the history of this family-owned store here.

I looked around for a while by myself, seeking something I might use to extend my Audrey block...


And I didn't see anything so I enlisted the help of Linda Ashton who has been working at Tinsel Trading for as long as I can remember .


Linda is an artist and a milliner.

As President of the Millinery Guild of New York, she was raving about the show, Hats: An Anthology by Steven Jones, at The Bard Graduate Center. I'll have to travel back to see the show before it ends on April 15, 2012.

Anyway, Linda found this vintage row of chevron silver ribbon. It had enough of a textural interest that it just might work...


And we liked it. It seems to unify the silver/mirror frame.


Today, I brought out both to compare and I think I need to sleep on it.

I like the velvet...and I like the silver...but I'm thinking I might need a combination of the two...or that I should cover a mat in the same velvet fabric I used in the piece and edge the inside of the mat with a silver trim...sheesh...so many decisions.

I'll think about it for the next few days. Regardless, it was a grand time in New York with my friend Helen...and what's not to love about Tinsel Trading?

It should be on your "Must See" list when you go to New York.

Having said that, it's especially fortunate to be able to go there when there is something specific that you're shopping for...

And they still have lots of those vintage sparklies I mentioned a few months ago...


Happy Weekend everyone!

Friday, July 22, 2011

A Framing Idea

I have a friend who is a framer and, lucky for me, she is willing to try new things.


I have 11 bead journals completed and they are all 5"x5". I did not want to frame each one individually...too expensive plus I don't have the wall space...

So, I asked my friend Terri to make me a shadow box that opens from the front. Rather than a hinge and closure, we tried using magnets so the entire box front lifts off...


It worked. Only trouble was she couldn't find a glue strong enough to keep the magnets from pulling out. Nothing a little bit of tape didn't fix...


She also put little blue tick marks so I know which side is the top.

The inside of the box is made with black suede mat board and I sewed a strip of velcro to the back. All that was left was to put the loop velcro dots on the backs of my bead journals. And voila!


I can change them out by the seasons. Since it was such a success, she's promised to make me a slightly larger one for my 8" crazy quilt blocks.

I'll be heading to the beach this afternoon and spending the next two weeks with four of my nieces while their Mom is in Italy and their Dad works. I'll try to post but if you don't hear from me, you'll know why.


Thanks to everyone who bought a fabric pack yesterday. I have one left in the shop here...At this point, I think we've raised at least $300 to contribute to the fundraiser. Thanks for that and stay cool everyone!

Monday, February 21, 2011

Lacing

Sorry folks.


Today's post isn't sexy at all.

It's boring. But necessary. Even important. But definitely not sexy.

The topic is lacing. It's what we do at the end of a project to give our needlework a finished look.

Scarlett O'Hara recognized lacing as the critical step she needed to endure in order to get that nothing of a waist into her ball gown.

But this picture of she and Mammy is the only sexy picture in this whole post. Now you've been warned so no complaining later...

Over the weekend, I laced and finished all eleven of my bead journals and submitted seven of them to the Woodlawn Needlework Show. (Yes, I decided to go for it.) And now I have the callouses and split fingers to show for it.

As I was lacing piece number 8, I finally remembered all of you....you lucky people.

And thought that maybe someone somewhere out there may need some tips on lacing. The rest of you whippersnappers can skip over this post and wait for a more sexy topic to emerge...

Warning: A high degree of patience is required for this activity. Lacing should not be attempted while consuming alcoholic beverages.

Step One: The Materials

  • Finished work
  • Acid-free foam core (I purchase from the framing department at Michaels or JoAnns)
  • Exacto knife for cutting foam core
  • Darning needle
  • A photocopy of the back side of your work
  • Warm and Natural batting (it's thin and 100% cotton, from JoAnns)
  • Upholstery thread
  • Sturdy pins
  • Tekobari or other long laying tool
  • Your knees
Step Two: Template and Layers

Robin Atkins taught me to take a photocopy of the back of my work. This gives a template to cut out the foam core in the exact shape of your finished piece. This was a brilliant step since most often our hand work changes sizes as we work the material. I always mark the back with a "T" for top.

Cut out the foam core with an X-acto knife using the photocopy template.

Cut Warm and Natural batting layer about a 1/2" wider than foam core.

Layer work (face down), batting and then foam core -- taking care to make sure that the tops are, indeed, all at the top...and that the edges of the foam core line up with the edges of your work.


Step Three: Summon your patience

Lacing is tedious especially when you have work that is highly three-dimensional like mine. Best to have limited distractions and lock up your children before you begin.

Step Four: Stretching and Pinning

Starting at top-center, begin pinning and stretching work working from the center out toward the edges, pushing pins into the foam core to hold the stretched fabric.
Once top and bottom are pinned, flip work to the side and pin and stretch from center working out toward edges...


When finished stretching and pinning, you will have pins all around your piece and you're ready to start lacing.

Step Five: Lacing

Using your darning needle, thread up a lot of thread -- you don't want to have to start a new thread if you don't have to. For larger pieces this is unavoidable. I used 6 yards of thread for each of these 5" x 5" pieces.

A note on the thread. I like Upholstery thread. It doesn't break and it has a twist that grabs the fabric and helps to keep your thread taut as you lace.


The goal of lacing is to certainly to have a stretched piece of needlework with even tension, without bumps and bulges. To me, the back also should have as little bumps and bulk as possible.

I lace the top/bottom first and then the two sides. Before I start, I trim the fabric at the corners to eliminate the excess bulk.


Also to reduce bulk, I use a half-hitch knot to get started. Do not knot your thread. First, I wrap my thread through the same starting hole about three times. Then, I slide my needle under the three wraps and make three half-hitch knots to secure my beginning thread.


Then I lace by slipping my needle from under the fabric, catching both the batting and the fabric, as I lace back and forth.


Notice my knees in this picture. I always hold my work between my knees as I lace so that the front of the work isn't smooshed in the process.

When I reach the end of the row, I wrap my thread around the final pin a few time just to temporarily hold it.


Then I take my laying tool, and go back over my lacing stitches, using the tool to pull the stitches tighter and my free hand to hold tension as I work my way back to the last pin.


Remove the pin and release the thread, keeping tension on thread. Holding lacing tight, I make a tacking stitch or two to hold the lacing in place before I begin lacing the sides.

Repeat for the sides. Remove all pins.


Step Six: Tack down corners

Using a sewing thread, I tack down the corners to make an even smoother backing. Sorry, no picture for that.

Step Seven: Sew on backing (optional)

If you are framing your piece, there's no need to put a cover on the back.

For my bead journals, I am having a friend make a shadow box and I plan to rotate my pieces through the frame as my mood dictates. I was trying to avoid the expense of framing them all individually.

I chose ultrasuede to cover my lacing and used the same photocopy template to cut the ultrasuede to the right size, taking care to match the tops together. Ultrasuede is expensive but is great as a backing fabric because it stretches and conforms as you stitch and the individual stitches sink nicely into the fabric and are hidden.


I then added a label to the back identifying the piece and my name and address. I should have put the date too so I'll add that when it comes back from the show.

That's it.


The only other thing I did was place each journal into a box to keep them from being crushed in travel and storage. I will also put the story of each piece inside the boxes for posterity and safekeeping.


And so, to the friends who are still here after this arduous post, I wish you all the best with your lacing.

It's not sexy. But it is rewarding.

If you spend so much time working on the piece itself, it makes sense to take some care in finishing it properly.

And please. Feel free to share any tips or tricks that you may have for successful lacing. I'd love to hear them.

Related Posts with Thumbnails