This past Monday Japanese Embroidery was on the tasting menu at our monthly Embroiderers' Guild meeting...

And the Master Chef in charge of the menu for the day was none other than my teacher Tonie Evans.

Tonie has been teaching JE for over 25 years in a home studio in Silver Spring, Maryland. There are quite a number of us in the Guild who are students of Tonie's. Some of them have been studying for over 20 years and are exquisite embroiderers themselves.
There were six of these graduates/upper level students on hand for Monday's class assisting with demonstrations and giving personal instruction under Tonie's supervision.
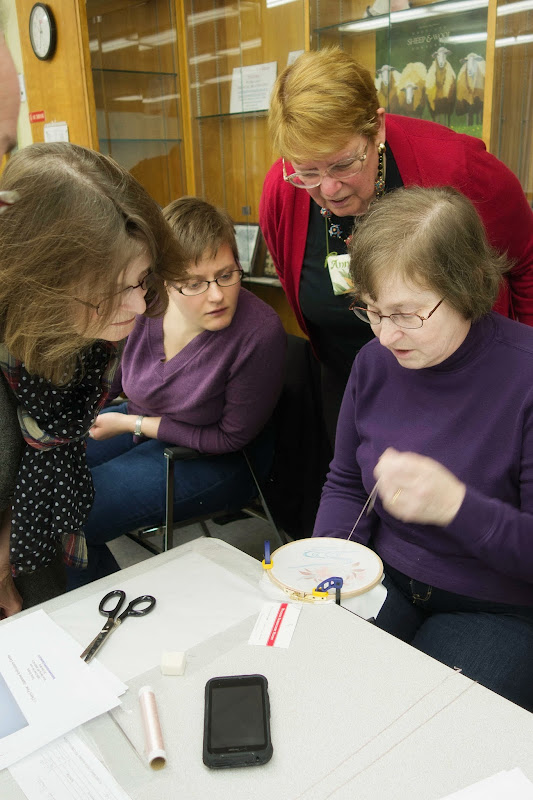
It made me smile to look around the room and see so many women helping each other and learning together.

The idea for the class was to allow interested students to sample various items on the Japanese Embroidery menu without having to invest in all the materials. Try it, see if you like it, before purchasing the typical tools used in JE: frame, flat silks, Japanese needles, tekobari (Japanese laying tool), awl, etc.
These tools were "rented" for the day, giving students a chance to try out some of the basics.
The tasting piece was titled Cherry Flow and is intended to introduce the student to stitching with twisted threads, flat silk, and metallic thread while using the traditional tools of Japanese Embroidery.
The silk was small enough to be stretched in a wooden hoop. The hoops were clamped to the edge of the table leaving both hands free for stitching. In Japanese embroidery, the right hand is kept above the frame while the left hand remains below the frame. It's a bit awkward at first but the reward is increased speed and control.
One of the differentiating characteristics of Japanese Embroidery is the twisting of long-filament flat silk into various types of threads, both stitchable and non-stitchable.
Flat silk comes on a tube and each strand contains approximately 12 strands of silk filament. The strand can be divided and combined to create various thicknesses of threads. This flexibility of creating so many types of threads from one spool of flat silk is a huge advantage for the embroider...no need to depend on the constraints of a pre-manufactured thread or to buy so many different types of thread.
The embroiderer now has the skill to vary the twist of the thread from soft twist to tight twist, to add metallic thread, to make couching threads, and to make subtle color changes by twisting different colors together.
Despite its versatility, learning to make your own threads can be quite challenging. There are many steps to making a proper twisted thread.
First an awl is wedged into one of the holes of the embroidery frame (see pic above). The awl is used for unspooling flat silk threads and holding them while a twisted thread is being made.
Once there are equal amounts of thread on either side of the awl to be twisted, one thread is placed in the palm of your hand. The thread is twisted by running one hand over the other hand to create the undertwist. After the first is twisted it is held in the teeth to maintain the twist while the second one is twisted
Once both threads have their undertwist, the tightness of the twist has to be checked so that both sides have a similar twist. If one side is tighter or looser than the other, the threads won't twist evenly.

Once the threads are comparable, the two sides are kept under tension from the awl and twisted together with the opposite hands.
For Z-twist threads, the undertwist is twisted on the right hand first and the overtwist is twisted on the left hand. For an S-twist thread, the process is reversed.
When you're first beginning, you can end up in all kinds of interesting positions as you try to hold your threads taut while twisting. Which might lead the photographer-of-the-day to take advantage of you...
Once you've made one thread, the next challenge comes in making a second thread or more with consistent twists.

Consistent twists are important when multiple threads are being used within one motif...
We made a soft Z-twist thread for the cherry blossom petals.
Consistency of twisted threads still remains one of my own personal challenges in my Japanese Embroidery practice. Sometimes what seems so simple, can be very complex.
After lunch, the class moved on from stitching the petals of the cherry blossom to stitching the stamens with Japanese metallic thread...
We then added knots to the end of each stamen by using an S-twist thread in pale yellow.
The leaves of the piece are stitched using flat silk, no twisting needed. Here's a picture of Tonie using the Japanese tekobari. The tekobari is used to the stroke and align the silk filaments which makes them shine...
The tekobari has dozens of uses in Japanese embroidery. Once I developed the habit of using it for Japanese Embroidery, I now use it for everything and feel naked if I have to stitch without it.
At the end of the day, all the students had a much better sense of the tools and basic techniques behind Japanese Embroidery and I'm hopeful that more embroiderers will give it a try.
For me, the practice of Japanese Embroidery continues to challenge me and I'm a better embroiderer because of it.
If you'd like to give Japanese Embroidery a try, Tonie teaches here in Maryland but she has students from neighboring states and some come from as far away as Canada. You can contact Tonie at tejapaneseembroidery (at) gmail (dot) com for more information.
The Japanese Embroidery Center in Atlanta is another place to learn and they can put you in contact with teachers from all over the world.
When I lived in Japan, the teacher would end class by bowing and saying "Gonbatte kudasai"...
Loosely translated"please do your best" or better still "accomplish much by working hard".
Gonbatte kudasai...
P.S. Here's a picture of the clamps we used...






14 comments:
Such an interesting post. I love the pictures...almost like being there. What are the clamps they are using for their hoops?
Weavers use twisters with two alligator clips to get the exact same twist in each ply. Each plied length can be the same as the next if you count the turns.
Just google "yarn twister for fringes"
Diane
Wish we had groups like that around here!
So much fun :)
Big hugs x
That's a great way to make Japanese Embroidery more approachable and what a sweet design. I bet a few ladies will now be hooked on Japanese Embroidery.
Wow, what gorgeous embroidery! And, such fun too! I love to see smiling faces! Thanks too for the link about the clamps. I've been meaning for some time to hunt me down some...and it's nice to know that these work well. Appreciate that nudge!
Hugs,
Kathy
Very interesting! Looks like you may have won some converts?
Wow...Twisting your own threads and actually understanding how to do it! The JE is stunning and seems to be a life's work to learn and be good at it. I like how the Japanese teacher ended her class.
xo,
Deb
I love these clamps for all of my embroidery. I've used them for as long as they've been available. I had to get another set because the boys kept "borrowing" them for woodworking!
This is totally fascinating, but I'm afraid I no longer have the patience for this kind of detailed work. Congrats on your son going to Northeastern - it's a great school. My son will be graduating from Northeastern's grad school with an MBA in Healthcare on May 2!
To study such techniques for so many years has to be a labor of love to stitch such amazingly beautiful Japanese embroidery. I always enjoy learning from your post Susan Dear.
Looks fascinating. I'd love to have the chance to learn someday.
Stuff that is simple to describe is very hard to get right. I'm sure a great day was had by all!
Wow ~ that whole twisting process is amazing! Love the dogwood piece!
Post a Comment