

Here is the planning page I used when I was considering doing a tea-themed pillow cover. Using a huge piece of graph paper, I often brainstorm all of the thoughts, pictures and ideas that could potentially be incorporated into my project. At the time, I began creating this tea pillow cover, I was playing with many ways of transferring images onto fabric. Here are some new things I tried:
- Using Lumiere paints, I used rubber stamps to transfer the three teacup image on the bottom left. I then stitched the middle cup completely to have it stand out.
- You can't see it very well in the picture, but I also embossed velvet with the words "earl grey" and "english breakfast" using a rubber stamp and an iron.
- I used a transfer sheet for the little quote and I transferred the little girl sipping tea directly onto silk habotai using my ink jet printer. Both the transfer paper and the silk came from Dharma Trading and I'm very happy with the quality of their stuff.
- The little tea therapy band aid in the upper right was a mistake at first. It started out as a transfer which I tea-dyed. When I started stitching it to the piece, it started looking like a band-aid to me so I went with that idea and used a micron pen to place all the little dots on it to make it resemble a band-aid even more.
- I used silk organza to make little tea bags which I plan to fill with special "tea" but now I'm not sure it will fit into this current piece...
- Lastly, this was the piece that I stitched a lot of my first 100 details in 100 days with Sharon Boggon.

It turns out, I had so many ideas that I decided to make a series of tea-themed pillows...

Just the other day, I was glancing at Cloth Paper Scissors magazine and came across the submission guidelines for their Mixed-Media Tea Party Challenge. I have never submitted anything to a magazine in my life but I am so close to finishing this that I think I could make the submission deadline of July 14 -- so, I think I'm going to go for it. It never hurts to try...
Now it's time to work out the final areas on my block. After taking Sharon Boggon's Encrusted Crazy Quilting course at Joggles, I have a whole different approach to my blocks and their design. That class really changed my stitching life and I highly recommend it if you haven't yet taken it. Now, as I look at my block, I see key areas that I want to stand out and emphasize. These will be the areas that I work on next and develop.
 I know for sure that I want this tea cup sitting on the table. I crocheted three little sugar cubes and have a vintage spoon pin to put in the bottom right hand corner on that lace "table"...
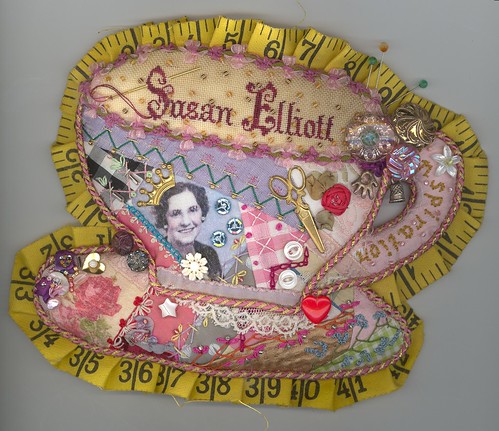
Also, I plan to submit pictures of the little teacup nametag I made. It's my cup of inspiration and has a picture of my grandmother on the front and....it's finished!


6 comments:
wow wow wow other words escape me. Do enter the contest!
This is just darling. Wonderfully detailed. Beautiful!
This is just so beautiful, you enter for sure,
I would love to see some of your work published, wouldn't you?
How utterly fabulous...
I particularly enjoyed seeing your graph paper "planning page". What a great way to work, looks like fun too.
I think I will try that for my next CQ, which is actually going to require some real thinking-things-through before I start.
Thanks so much for giving us this look into your creative process and beautiful work! And let us know how it goes at the Textile Museum...
I am floored by all the attention to detail here. You are so imaginative; I'd give anything to be so creative, but as an Aries, I was born to be practical :-) and can only follow patterns, not create them!
I love your blog - you've been added to my favorites and will be on the side bar soon!
Gina in Melbourne Australia
Post a Comment